Custom Waterslide Decal Headstock – DIY SG Kit Part 3
Create and Apply Custom Waterslide Decal – Build your Own Guitar Kit
 This post is going to show you how to design a Custom Waterslide Decal and paste it on your guitar headstock. This is the third article in the series dedicated to “how to Build your Own Guitar Kit”.
The Custom Waterslide Decal process should typically happen before applying the varnish. First, the guitar was entirely painted in a dark brown color. It was impossible to add a Waterslide Decal on the headstock because the background was too dark. I knew it was going to happen, but I expected a better outcome.
>>>Waterslide Decal Paper<<<
There’s no white ink in printers. Thus, all colors using white pigments are altered when printed on a transparent support. Because of that, the actual background color replaces the white coloring.
One of the solutions is to use white transfer paper. The other solution is to change the color of the headstock for a paler coloring.
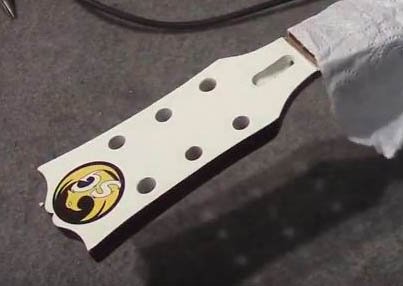
My first reaction was to keep the guitar logo free. That’s why I skipped that step in my how-to series and jumped to the lacquer process. After finishing the guitar body, I felt that a logo free guitar looks unfinished. So, I decided to paint the Headstock in white and use my Custom Waterslide Decals.
I had to sand the guitar head to remove the lacquer. This time, I used regular car spray paint, instead of nitrocellulose guitar paint. The result is excellent, and I’m going to use that type of paint for the next project.
>>> Herve Senni Streaming Sites Catalog <<<

Nitrocellulose Guitar spray is ideal for a translucid finish. But for opaque color, the only difference is the price. Also, car paint is much more robust. I don’t recommend it for an acoustic guitar, but for a solid body, it is just as good. Especially if the guitar body is made of a light wood like basswood. It will solidify it and protect it better.
Creating and applying your logo using waterslide decals is a straightforward and affordable process. It is the best solution to give a professional finish to your guitar. You must preferably do that before varnishing the instrument. The transfer is going to be under many coats of varnish and will be perfectly protected.
You can place a waterslide transfer above the varnish if you want to customize a guitar. But the decal will be altered over the years. In the case of building a guitar kit, you must achieve this process before applying the varnish. This is how manufacturers proceed.
The ultimate solution would be to make your inlay and insert it in the wood directly. That is an advanced technique that requires tools and experience to achieve well. So, unless you are an accomplished carver, I highly suggest skipping that one.
So, the best and most affordable alternative is the waterslide decal. It is quite simple to do, and can easily be removed if you’re not happy with the outcome.
>>> Micro Sol Setting Solution<<<
>>> Hervé Senni YouTube Channel<<<
Tools Needed to Create a Custom Headstock Decal
- Printer (inkjet or laser)
- Waterslide paper
- Cutter or sharp scissors
- Micro Set Solution (not mandatory but helps to paste or remove the decal)
- Varnish (the same one you are going to use to varnish the instrument)
- Imagination
First, let’s start with the design.
 There is not a unique way to come up with a logo. You might already have your own like me.
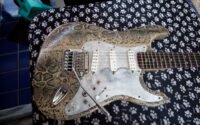
One way I find interesting is to use google images and search for a tribal tattoo design. You can search for the generic term “tribal tattoo”. You can also narrow your search for a particular animal or subject if you have something in mind. Like “lion tribal” or “tiger tribal”.
Just remember that the decal is going to be small, so you need a simple sketch. That’s why tribal tats are right to use for logos. That type of illustration is simple and sports a logotype of look.
>>> Large choice of quality Guitar kits at a low price<<<
Also, you have to take pictures of the headstock to test colors in photoshop. There is a vast difference between how the color looks on your screen and how it looks once printed. But it is a good sign of how the outcome is going to be. For instance, the color looks much lighter once printed.
I suggest printing different versions to have a wider choice. Because whatever you do, there’s going to be a difference on how the logo looks once printed.
When you are happy with the outcome, cut the transfer as close as possible to the border of your logo. The better you do, and less you’ll see the edge of the decal when glued on the guitar headstock.
You must apply two coats of varnish on the transfer to protect the ink from being diluted by the water. Do not use a heat gun to speed up the drying process. The transfer might curl and shrink. Only add two thin coats of varnish and let it dry.
When the decal is ready, soak it in some water and wait 30 seconds to a minute. When you can slide it and split it from the paper support, the decal is ready to be transferred.
If you have some Micro Set Solution, apply some at the spot you plan to insert it. It’s not mandatory but helps to glue the decal faster and allows you to slide it more evenly until you find the perfect alignment.
When the transfer is aligned, remove water and air bubbles stuck between the decal and the wood. You can apply some Micro Set Solution again over the decal to make it blend completely with the wood.
Let it dry for a couple of hours and administer two or three coats of varnish over the entire guitar headstock. That’s all folks.
>>> Large choice of Electric Guitar if you don’t want to build it<<<
Furniture needed
- Waterslide Decal Paper @ AliExpress
- Micro Sol Setting Solution @ AliExpress
![]()
|
 Distribute your music using Distrokid
I am Hervé Senni, a pro musician and performer, Composer and arranger for quite some time. My main musical instrument is the electric guitar. I am also a bass player, mandolin, Ukulele player. I also invented string instruments.
Over the years, repairing and improving electric guitars that did not have to be upgraded converted me into a self-taught luthier.
This post is also available in: French

Tony Iommi Pickups Magnum 4 and hyperflux 5 & Guitar Roller Nut – Les Paul Junior Double Cutaway Kit Update

Custom Baritone Guitar with Fanned Frets, Artec H.B.L.C. Hot Rail Humbucker, and Spin-a-Split Wiring
Custom Scalloped Stratocaster – Seymour Duncan SJBJ / SDBR / SL59 – Kahler vibrato
About The Author
Hervé Senni
I am Hervé Senni, a pro musician and performer, Composer and arranger for quite some time. My main musical instrument is the electric guitar. I am also a bass player, mandolin, Ukulele player. I also invented string instruments. Over the years, repairing and improving electric guitars that did not have to be upgraded converted me into a self-taught luthier. Read More


